One Smart Little Cookie is a collection of everything that brings inspiration, comfort and beauty into my life and home.
I love to create a beautiful home and enjoy it with my family.
It is sharing
what I love to do; baking and cooking in a healthier way without sacrificing flavor
, crafts,
party planning, activities, organization, and home decor.

Being a "Smart Little Cookie" is not about being perfect, it is about knowing how to enjoy life and family to it's fullest~to your fullest.
Due to my creative process, my home gets messy, my kids play in their jammies-all day sometimes (the terribly relaxed days tend to be my favorite),
and my hubby has become much more patient and supportive over the years with all of this.
In fact, he often has his own creative ideas and we both find ourselves anticipating our upcoming projects together~love him!
Don't get me wrong, I LOVE a clean house, but I've rejected denial, and with a toddler who is a budding creative type herself,
I feel accomplished when the dishes are in the dishwasher before naptime (not mine, hers).
I've accepted the fact that "spotless" cannot mean what I have always
envisioned in my mind, at least not with kids,
and I would rather enjoy my kids and beautiful home, than a spotless, sterile home.
I have learned to take each day, one day at a time, and everyday should leave us feeling inspired and more contented.
The day should leave us, whispering in our ear, "the day has been as well as it could have been done, and it has been done well."

Go ahead and take a bite, indulge yourself and try my recipes and crafty creations in your own home.
I hope to inspire you to feel like the "Smart Little Cookie" you are!


Friday, December 23, 2011

So this is my little Luci's first Christmas, and as a tradition in our family I make each of our children's stockings.  I just finished hers today~

The front


and the back


I love how it turned out!~

Now onto what has been developing in our home.  Our elf, Pinocchio, has been pretty busy it seems when he returns from reporting to Santa...


Our daughter's have waken up twice to find him being sweet to Snow White! Little rascal.

I guess when Snow White isn't around for games and stories, he get's a little bored and into mischief...he opened one of our family gifts!


My husband has now become a master doughnut maker.

Pinocchio also crowned our Christmas Tree with Mrs. Potato Head...poor Mrs. Potato Head.


 How can you get upset with an elf that studies the Bible?


And holds Baby Jesus.


We can't wait to have him back in our home next year!

 Besides yummy doughnuts, we've been enjoying a delicious goat cheese my friend introduced me too a few weeks ago, it's Amazing! But top that cracker with Boursin goat cheese and homemade "Crazy Tangy Cranberry Sauce" another friend made, and you get Christmas on a cracker in two bites.


Thursday, December 15, 2011

Chocolate Candy Cane Hearts

I found these Adorable candy cane hearts on glorioustreats.blogspot.com.  They're so cute and so simple to make!  My favorite kind of crafty treat.
I think they're the perfect Christmas treat for my daughter's amazing school teacher.


Pick your candy canes, mini or large, I used large.  Place a piece of parchment paper on a cookie sheet.  Place candy canes on parchment paper and position into heart shapes.  

For 2 large hearts, melt 1/3 bag white chocolate chips (I used Ghirardelli) for 30 seconds at a time.  White chocolate never fully melts to the same consistency as milk or dark chocolate without caking.  So melt it carefully, mixing with a fork in between melting times until you get a spoonable consistency.  

While chocolate is melting I like to crush one candy cane into a mixture of small chunks and powder.  
Spoon chocolate into 1 heart at a time.  If the candy canes move around, reposition them together and continue spreading until the chocolate is touching all interior sides of the heart.  

Sprinkle with crushed candy canes.  I also used white sugar crystals to give my hearts an extra fancy touch and sparkle!

Place cookie sheet into freezer for 10 minutes until chocolate has set.  Take out of freezer and place on counter until the hearts reach room temperature.  


Package as you wish! I'll be placing mine inside cellophane bags with ribbon to finish.


Smart Little Cookie Tip:
You can use any sprinkle your heart desires; jimmies, colored sugar sprinkles, crushed cookies...also, you could use milk or dark chocolate to fill the hearts.


Wednesday, December 14, 2011

Chocolate-Peanut Butter Chip Cookies

It has been a very long time since I last posted any recipes-5 months!  I've been very busy with my new sweet baby girl, my adorable 2 older girls and our new 5-year-old Shih Tzu doggie, Shamu.  My blog has not been far from my thoughts though.  Today I was in a chocolate chip cookie mood.  Not just any chocolate chip cookie...an ooey gooey chocolate chip cookie.  The only issue? I was out of my staple, I Can't Believe It's Not Butter spread...great.  So what did I do? What I always do, I improvised.  After all, ooey gooey chocolate is always worth an improvisation.  

I wanted to name these I Can't Believe There's Only 1 Tablespoon of Real Butter Chocolate-Peanut Butter Chip Cookies, but for the sake of title space, I shortened it.
 These cookies are crispy on the outside, moist and dense on the inside.  
Makes 2 dozen


The Recipe


1T unsalted butter, melted            2 1/4 c unbleached flour (or all-purpose if you prefer)
3/4 c granulated sugar                  1 t baking soda
3/4 c packed brown sugar             3/4 t salt (I use Real Salt-it contains healthy minerals!)
1 large egg, plus 2 egg whites       1/2 pckg chocolate chips (I use Ghirardelli Bittersweet)  
1 1/2 t vanilla                              1/4 pckg Reese's peanut butter chips


Preheat oven to 350 degrees.  Beat sugars with melted butter, it will resemble moist sand.  Add egg, egg whites and vanilla.  Mix until blended.  

Combine flour, baking soda and salt in a small bowl; gradually add butter mixture, mixing just until blended.  Add chocolate chips and peanut butter chips, mix until evenly blended.

Using a cookie scoop, scoop and press dough against mixing bowl, compacting it tightly.  Place on cookie sheet that has been lined with sprayed parchment paper.  Bake until cookies start to turn golden on top, take out of oven and let cool on wire rack.

Enjoy!


Monday, July 18, 2011

Moist Chocolate Bundt Cake

This Chocolate Bundt Cake is extra moist and delicious! The proof is in the...yogurt?


The Recipe

3 c unbleached flour                                            1/2 c plain fat free Greek Yogurt
1/2 t baking powder                                            2 c natural sugar
1/2 t salt                                                            2 t vanilla extract
3/4 c unsweetened cocoa powder                         3 eggs plus 4 egg whites
1 c I Can't Believe It's Not Butter spread, or          1 c skim milk  
1/2 c real butter

Preheat oven to 325 degrees.  Spray 10 in. Bundt pan with Pam for Baking spray.

Sift flour, baking powder, salt and cocoa.  Set aside.  In a mixing bowl, cream butter, greek yogurt, sugar, and vanilla.  Add eggs and egg whites one at a time (mix egg whites two at a time), beating well after each addition.  Add flour and mix alternately, starting and ending with flour mixture.

Pour into Bundt pan and bake for 65-70 minutes, or until toothpick or cake tester comes out clean.  Let sit for 10 minutes, then turn out onto a wire rack or plate to cool completely.

When cooled, drizzle Chocolate Glaze over the top ridge of the cake in a zig-zag design, allowing the glaze to follow the natural lines in the bundt cake.  Reserve extra glaze for sliced pieces of cake once sliced.


Chocolate Glaze

2 c powdered sugar                                                 1/2 t vanilla extract
4 T unsweetened cocoa powder                                4 T skim milk
1 T I Can't Believe It's Not Butter spread, 
      or Real Butter

In a medium bowl, cream butter with powdered sugar and cocoa.  Add vanilla, then add milk gradually until smooth; adding more or less to desired consistency.


Smart Little Cookie Tip:
I LOVE Greek Yogurt.  I love to eat it plain, with fruit, in dips, and in my baking recipes! Substitute an equal amount of Greek Yogurt, or your favorite plain yogurt, in place of any fat in a recipe; for sour cream, shortening, even eggs! Only substitute one of these ingredients in any one recipe or the magic won't work!
I also cut 1 whole cup of sugar out of this recipe and it still tastes sweet and delicious!

You can bake your Chocolate Bundt Cake and eat it too!


Cinderella Ball Birthday Party

My second oldest daughter recently turned 4-years-old, and in light of recently giving birth to our third baby girl, we managed to celebrate our little Cinderella with several of her sweet princess friends by having a Cinderella Ball Princess Party!
I displayed the glass slipper Cinderella didn't lose on the stairs of the Prince's Castle, in the center of the party decorations.


The Decorations

Blue and Pink Tissue Peonies


Yellow Tissue Daffodil
 Smart Little Cookie Tip: 
In place of making tissue balls, I made tissue flowers.  To do this, I used half the amount of tissue asked for in these instructions from Martha Stewart: http://www.marthastewartweddings.com/article/pom-poms-and-luminariashttp://www.marthastewartweddings.com/article/pom-poms-and-luminarias; Love Martha!
Instead of fanning the tissue into a ball shape, I fanned the tissue out and teased it forward into a flower shape; I then used double stick tape to "arrange" the flower petals.  I'm very happy with how they turned out and wish the tissue was floral scented!


Party Games

Painting Nails 

Princesses need to look their very best for the ball, and every princess has her own unique personality;
they loved all of the pretty colors and stickers!


Pin The Crown on The Princess


Bippity Boppity Boo-Freeze Dance
Before dancing, we made sure the glass slipper fit Cinderella's foot-it did!


The Party Favors


Among the treats in the party favors, were pumpkin sucker rings I found at orientaltrading.com.  Of course each favor was finished with a homemade glass slipper tag.  They fit the theme perfectly!


The Cupcakes

Chocolate cupcakes filled with a fresh strawberry filling and topped with a Strawberry Jam Buttercream-Yum!!


The Fun!


It was such a charming morning with these little princesses!

Tuesday, June 14, 2011

S'mores Pops

My daughter's and I are so excited Father's Day is coming up!  My hubby is an amazing husband and dad and we can't wait to spoil him.
These little goodies are super easy to make.  It's a good thing, because you'll be making more for the dad in your life soon after the first batch disappears!


The Recipe

Jumbo Marshmallows
Dark or Milk Chocolate Chips
Crushed Graham Crackers
Sucker Sticks

Melt about 1 cup chocolate chips in microwave for 1 minute at a time, stirring in between each minute until chocolate is melted.  (you could also use a double boiler,
but I think the microwave is quicker.)
Put two marshmallows on a stick and dip into the melted chocolate, use a spoon to completely cover the marshmallows, if needed.  Tap the stick against the rim of the bowl to catch any excess chocolate.  Roll the chocolate covered marshmallows in the crushed graham crackers.  Place on a cookie sheet that has been covered with parchment paper.  When all of the S'mores Pops have been made, transfer the cookie sheet to the refrigerator for 10 minutes.  If your making these ahead of time, put the pops in a large ziploc bag and seal out any excess air and store in the refrigerator, no longer than a day.  This will keep the marshmallows from drying out.

Smart Little Cookie Tip:
My daughter's and I are going to make a S'mores Pop Bouquet for Father's Day.  To do this, use long sucker sticks and arrange the pops in a vase.  To help the pops stay in place, fill the bottom of the vase with your husband's, or father's favorite candies.  What dad wouldn't want a delicious bouquet of treats he can eat?

You can coat the chocolate marshmallows with almost anything.  Use sprinkles, chopped nuts, coconut, or drizzle with a little caramel...mmm, the possibilities are endless!


Thursday, February 24, 2011

Scrumptious Banana Cake


I made this delicious cake to celebrate my newest niece's First-Month Birthday.  I've been on bed rest and immediately following my release, both of my daughters became sick.  So, I'm anxious and excited to meet this new little addition to my extended family!
What better way to celebrate her first month of life than with a Scrumptious Banana Cake decorated in sweet pink frosting.


The Recipe

                 1/2 c unsalted butter, softened        3 ripe bananas, mashed
                 2 3/4 c unbleached flour                  1/4 c applesauce
                 1 1/2 t baking powder                     1 t vanilla extract
                 1 t baking soda                               1 2/3 c sugar
                 1/2 t salt                                        4 large eggs


Preheat oven to 350 degrees F.  Line bottom of cake pans with parchment paper cut into the shape of pans being used.  Spray and dust with flour; set aside.  In a medium bowl, sift together flour, baking powder, baking soda, and salt; set aside.  Mash bananas and transfer to a small bowl, mix together with applesauce, and vanilla; set aside.
In a seperate medium bowl, beat butter and sugar until light and fluffy.  Add eggs one at a time, mixing after each addition.  Add flour mixture in two parts until blended.  Mix in banana mixture until just combined.  Transfer batter into prepared cake pans and bake about 30 minutes until golden brown, or when a cake tester inserted into the center comes out clean.
Invert cakes out of the cake pans, peeling away the parchment paper and carefully place each cake right side up on a wire rack to cool.


Crumb Coat and Frosting


When cakes have cooled, transfer the cakes into the refrigerator until set, this will eliminate any breakage while applying the crumb coat.  In the meantime, 
make ~The Perfect Frosting~


The Perfect Frosting
(for anything you might like to frost to perfection!)

1/4 c butter, room temperature
1 16-ounce package powdered sugar
1/4 c milk
1 t vanilla

Beat butter until smooth and creamy; gradually add powdered sugar, beating until well blended.  Add milk a little at a time and vanilla.  Add more milk and powdered sugar as needed until smooth.  (Double this recipe when using as a crumb coat and as frosting)


 Crumb Coat

 Take cakes out of the refrigerator.  Working with first cake layer, frost a thin layer of The Perfect Frosting on the top and side.  Do the same with the second layer.  Return both layers to the refrigerator until set, about 1-2 hours.  


 Frosting

 When crumb coat is set, frost the top of the first layer with The Perfect Frosting.  Place the second layer on top of the first and frost entire cake.


Smart Little Cookie Tip:
Use any flavor extract your heart desires.  I use this frosting universally on everything from mint-frosted brownies, to sugar cookies, to cakes! It's my favorite, and I'm happy to share it with each of you.
You may like to use a cream cheese which would also be a delicious flavor combo with this cake.  Mmm...my mouth is watering!


This Banana Cake is both Chic and oh, so Scrumptious!

Sunday, February 13, 2011

Happy Valentine's Day!


I love the rich color in this Valentine! 
I hope you each have a day full of love, love, love!

Saturday, January 22, 2011

Under The Sea Birthday Party

My oldest daughter just turned 7 years old and Loves Ariel! So, for her friend party she really wanted to have an "Under The Sea" party.  
I tried to make it as original and sweet as I could.  Something I hoped a mermaid like Ariel would like to attend while on land.


The Decorations


Smart Little Cookie Tip:
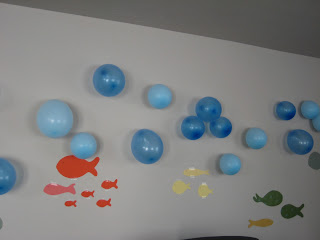
Balloon "bubbles" float above the fishies I cut out of cardstock and scrapbook paper free handed.

Fishies swimming through and around the "seaweed" crepe paper.


Party Games

When the princesses arrived, they each chose a hibiscus flower clip (the flower of mermaids) for their hair and a mermaid name chosen by combining their favorite color with their favorite gemstone, 
making them mermaids for the afternoon!

Pin The Flower on The Mermaid

For this game I printed an image of Ariel and mounted it on cardstock.  For the flower, I printed a beautiful coral hibiscus flower also on cardstock 
and used double stick tape on the back so the girls could try to pin it on Ariel's hair while blindfolded.

Feed The Shark

 My hubby made this awesome shark for me.  He did a great job! For this game I purchased the cutest little bean bag fishies at orientaltrading.com.  The girls had so much fun playing, this was hands down their favorite game at the party!
We also played freeze dance to The Little Mermaid Soundtrack, which was also a big hit!


The Party Favors

 These are the adorable party favors I found at orientaltrading.com as well. The cost of a "cake" of ten is the same price as a package of colored paper bags, I had to get it! I printed and cutout starfish name cards and placed them on top of the favor boxes to add to the mermaid theme.


Under The Sea Punch

I mixed 2 liters of Sprite with 2 drops blue food coloring, that easy!


 The Cupcakes

You can make any flavor cupcake your mermaid's heart desires.  Mine loves chocolate, so I made chocolate cupcakes, filled them with lemon creme filling, frosted them with a turquoise "bubble" ring and topped them with a chocolate molded flower.  She Loved them!

Smart Little Cookie Tip:
You don't need to use the expensive chocolate melting wafers found at craft stores.  I prefer to use chocolate chips.  Melt them for 20 seconds at a time, pour into candy molds that fit the theme of your party and freeze until set.


The Ice Cream

 Smart Little Cookie Tip:
This is a great tip I read about somewhere a while back.  The day before the party, scoop ice cream into cupcake cups, cover and freeze.  No messy hands while scooping ice cream at the party, no waiting and no melted mess on the party plates or your floor during cake and ice cream time!
I LOVE this tip!


The Fun!


It was such a fun afternoon with these Little Mermaids!